Thursday, January 31, 2013

29 Faces 2013 Challenge Here We Go!

I'm so excited to participate in this years 29 Faces challenge! I did this last year and it really pushed me to do something creative everyday. It's a great way to just let loose and try new things with your art. For me, my Ipad has been my canvas for the last few weeks. I use an App called 53 Paper.  Super simple, but versatile! I love it! So I will continue to use my Ipad, but also will bring out my art journals that have sat for far too long! I'm excited to see what all the other participants come up with, and hopefully will be making some new art friends from around the world!

Version 1: Done in 53 Paper App for Ipad
Version 2: Tweaked texture and colors in Snapseed App for Ipad
If you are interested in joining the 29 Faces Challenge for 2013 you can click here to get started! Hope to see you there!


Best of intentions gone astray...

I had the best intentions of getting out of the house today and getting some errands done,but I sat down to mess around with my bullets, beads and wire...and before I knew it, the kids were home from school! Oops, Hubby won't be happy with my lack of household productivity today, but I just couldn't put the stuff down! Do you know what I mean? It's a combination of joy and guilt all at the same time. I should have been cleaning, shopping, cooking...but I PLAYED instead! Here is what I created today (and last night). These are pendants and earrings made using recycled bullet casings, beads and wire.
I'm not super great at the wire wrapping yet, but I sure am having fun playing with all of it! The pictures don't convey the colors well...but this one below is made from silver colored bullet casing and the wire is copper and silver. This one is my favorite.
This next one, REALLY didn't photograph well. The casings are brass, wire is copper and the beads are various shades of purple. The purples didn't come through we'll in the photo.
Just like the one above, the purples in this didn't come through. It is all silvers, purples and copper wire.
I just couldn't photograph this one at all. It's very simple and very pretty, silver with the turquoise bead wrapped in silver and crackled marble below.
Last but not least, these cute earrings are made of brass .22 shell casings, brass wire and copper wire hearts with purple and green accent beads.
Overall, I'm pretty happy with most of these. But now, I must go and accomplsh something of value to my husband or ill never hear the end of it!

Tuesday, January 15, 2013

New Pendants...New Designs!

Finally finished these new pendants using older artwork and my ipad to create new designs!

Artplaytoday.com

These new pendants will be listed on my website artplaytoday.com sometime in the next day or two, but wanted to share them here first!


Monday, December 31, 2012

A collection of things to think about in your new year...


Old Artwork, New Images...Using Your Ipad to Create Something New!

From this Original Painting...
From this original painting to.......these cool images!


Using the ipad app "Pho.To Lab" (free) you can use this kaleidoscope filter to generate numerous, unique images to print and use in your mixed media art and jewelry. I stayed up way past "sensible" making these last night. It became addicting, wanting to see what each new image would look like!
I have barely scratched the surface of what I can do with this amazing tablet! If you have a favorite App you like to use in creating and/or managing your artwork, please tell us about it! Comments are always welcome here at Artplaytoday and I look forward to them!


Happy New Year!


Kristen


Friday, November 30, 2012

Experiments...always a good way to discover cool new techniques!

The other day, my daughter asked me to do a resin pour on a little project she had going. I ended up with a lot of resin left over, so I grabbed all sorts of odds and ends I had laying around and started experimenting with wire, tissue, foil, vintage catalogue pages, beads and jewelry findings. Anything with an edge that I could pour the resin into. The picture below is a collection of all my new little "charms" that I will eventually use in my jewelry projects.
Towards the end, when the resin was starting to get too thick to pour, I mixed in some pearl-ex pigment powders and found out it makes a really cool, faux enamel look! The little red, green and blue are the ones with the pigment mixed in. For me, this is a great discovery! Now I won't have to waste any extra resin, because with the pigments mixed in, you don't have to worry about getting any bubbles out. Ordinarily, for a clear, topcoat pour, you have a fairly short working time to be able to use a torch and release bubbles so its perfectly clear. This new discovery has got me thinking about all sorts of new ideas!
The night I did this, I couldn't sleep a wink because my brain wouldn't stop spewing ideas that I want to try. I hate it when that happens, but I also love it, because it opens up the floodgates for all sorts of renewed inspiration.
So if you are stuck in a rut, or creatively blocked, or just need a change, try something new that you haven't tried before with your existing art supplies!


Monday, November 19, 2012

Make your own texture stamps using a flip flop!

A few days ago I posted a really cool video on my Facebook page about using different kinds of foam you might all ready have at home...to make stamps for your mixed media work or paper craft projects. If after reading this you want to see the video you can see it  HERE.

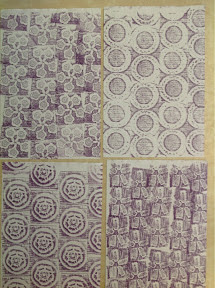
I decided to see how we'll it worked and was pleasantly surprised! Here are some samples of the stamps I made, by cutting up an old flip flop.

Here is what you will need for this project:
A foam flip flop ( you can buy them at the dollar store)
A heat gun
A variety of objects from around the house to use for impressions ( I used jewelry findings, my daughters plastic headbands, beads etc...
Scissors or a craft knife
A heat safe surface

1. Cut your foam flip flop into squares, rectangles, or whatever shapes you like.
2. Lay out your object(s) that you want to use for your impressions in an arrangement that will fit your foam piece
3. On a heat resistant surface, use your heat gun to heat the surface of your foam ( keep heat gun moving and hold about an inch or 2 above the foam). Heat for approx. 20 to 30 seconds...don't burn your foam!
4. Quickly take the heated side of your foam shape and press it down on to your chosen object(s). Press hard with even pressure for about 10 seconds. You should now have an impression embedded in to your foam...yay!
5. Now test your image with a stamp pad or paint on to paper or fabric. If you don't like the image you get, simply reheat the foam and try again! You can reuse your foam pieces over and over again, because the heat gun will return the foam to its original flat surface!

And that's it! Five easy steps to making your own stamps! Here are some ideas for using them in your art...

---Make your own decorative papers to use in collage work.
---Use fabric paint and stamps to create unique fabric prints to use in your quilting or sewing projects.
---Use your new stamps to create beautiful backgrounds for art journals, ATC's, paintings etcetera...
---Create fun gift tags and cards.
---Make your own patterned gift wrap.
---Create fun borders around stationary or frames.

I hope you have as much fun with this as I did!

- Posted using BlogPress from my iPad